
What Happens Inside Your Walls When Moisture Goes Unchecked
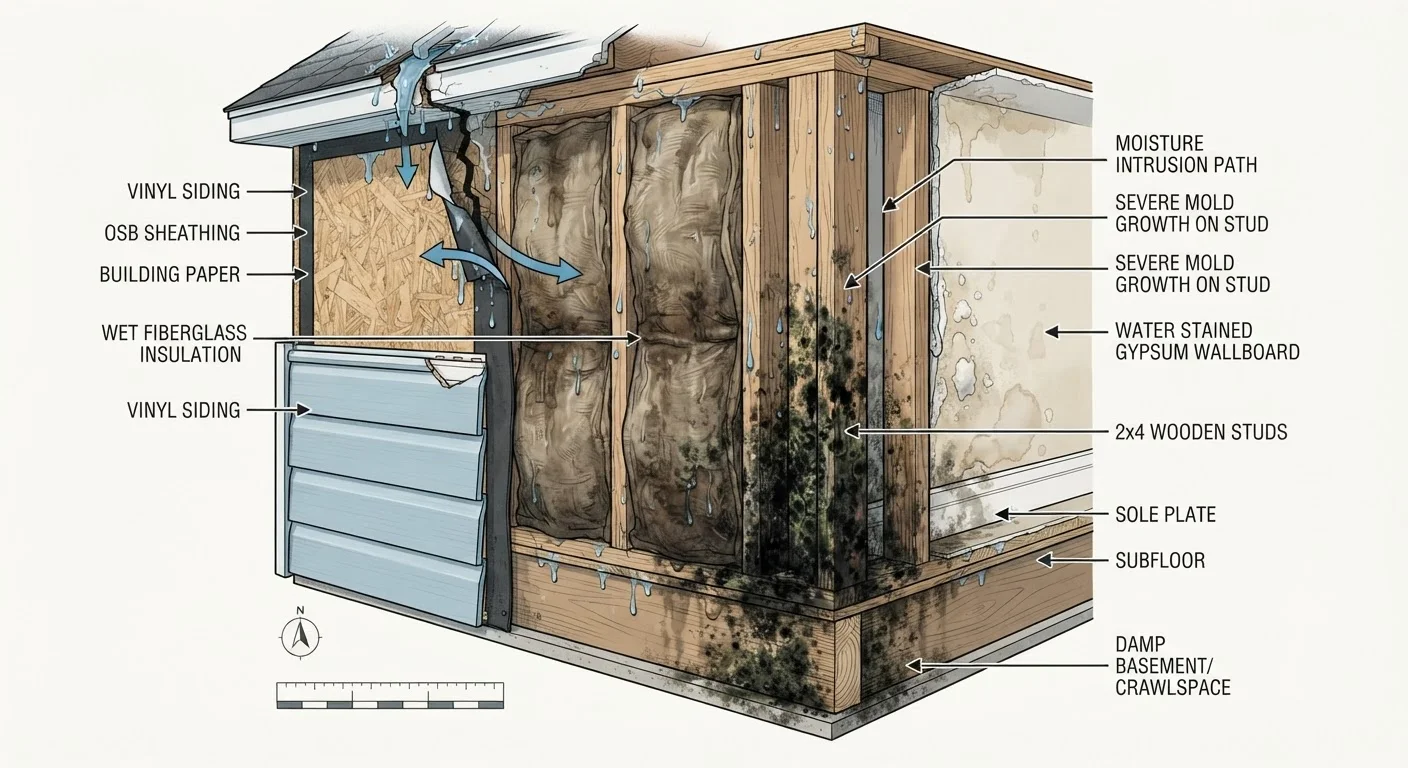
Photo credit: FaqInsider.com
In this article
Hidden moisture leads to mold, rot, and structural weakening. This explainer covers how it starts, spreads, and how to catch it early.
Key Takeaways
- Moisture inside walls often originates from condensation, plumbing leaks, or gaps in exterior weatherproofing.
- Wood framing begins to support decay fungi when moisture content exceeds roughly 19 percent.
- Mold can begin colonizing damp wall materials within 24 to 48 hours of sustained wetness.
- Early warning signs include musty odors, peeling paint, soft drywall, and unexplained allergy symptoms indoors.
- Ventilation, vapor barriers, and prompt leak repairs are the primary defenses against hidden moisture damage.
- Electrical wiring and insulation both lose effectiveness and become safety risks when exposed to sustained moisture.
Where Moisture Comes From
Water finds its way into wall cavities through several distinct pathways, and understanding them is the first step toward prevention. The most common sources include:
- Plumbing leaks: Supply lines and drain pipes running through walls can develop slow drips that go undetected for months.
- Exterior infiltration: Gaps around windows, doors, and penetrations - plus damaged siding or flashing - allow rain and groundwater to seep inward.
- Condensation: Warm, humid interior air contacts cooler wall surfaces and releases its moisture, particularly in bathrooms, kitchens, and laundry rooms.
- Roof leaks: Water traveling down rafters or sheathing can enter exterior walls far from the original entry point, making the source difficult to trace.
Each pathway creates a different moisture profile inside the wall, which affects how damage develops and where you're most likely to first detect it. See our guide to reading your home's warning signs for help connecting visible clues to underlying causes.
Climate Zone Affects Your Risk Profile
Moisture dynamics inside walls differ significantly by climate. In cold climates, condensation risk is highest in winter when warm interior air contacts cold wall surfaces. In hot, humid climates, the risk can reverse - outdoor humidity drives moisture inward during summer. The appropriate vapor control strategy for your home depends on your specific climate zone, so general advice may not apply directly to your situation.
The Progression of Hidden Damage
Once moisture enters a wall cavity and cannot escape, a predictable sequence of deterioration unfolds:
Stage 1 - Saturation of Insulation and Drywall
Fiberglass and cellulose insulation both absorb water readily. Saturated insulation loses most of its thermal resistance (R-value) and becomes a reservoir that keeps surrounding framing continuously damp.
Stage 2 - Mold Colonization
Mold spores are always present in indoor air in small quantities. When relative humidity inside a wall cavity stays above roughly 70 percent and temperatures are moderate, spores land on damp drywall paper or wood and begin growing within 24 to 48 hours. Mold spreads by releasing additional spores, which can migrate through gaps into living spaces.
Stage 3 - Wood Decay
Wood framing - studs, plates, and sheathing - begins to support decay fungi once its moisture content exceeds approximately 19 percent. Decay fungi consume the cellulose and lignin that give wood its strength. A stud that looks structurally sound on the outside may have lost significant load-bearing capacity internally.
Stage 4 - Systemic Compromise
At advanced stages, moisture damage can corrode metal fasteners and connectors, degrade electrical insulation on wiring (creating fire and shock hazards), and compromise the bond between wall sheathing and framing. At this point, remediation typically requires opening walls and replacing affected materials. Understanding the role your walls play structurally is important here - our article on load-bearing vs. partition walls explains why not all walls carry the same risk if weakened.
~19%
Moisture content threshold for wood decay
Building science research consistently identifies roughly 19 percent moisture content in wood framing as the point at which decay fungi become active and structural degradation begins.
24-48 hrs
Time for mold colonization to begin
According to the U.S. Environmental Protection Agency, mold can begin growing on damp building materials within 24 to 48 hours under favorable temperature and humidity conditions.
30-50%
Recommended indoor relative humidity range
Many building and indoor air quality professionals recommend maintaining indoor humidity within this range to inhibit mold growth and reduce condensation risk inside wall assemblies.
Early Detection and What to Do
Catching moisture damage before it reaches Stage 3 or 4 dramatically reduces the cost and complexity of repairs. Here's where to focus your attention:
- Smell first: A musty or earthy odor - especially in rooms with plumbing - is one of the earliest and most reliable indicators of mold activity inside walls.
- Inspect surfaces: Bubbling, peeling, or staining on painted walls and ceilings, particularly in corners near exterior walls or below windows, warrants investigation. Soft spots when you press drywall indicate saturation.
- Check humidity levels: An inexpensive hygrometer (a device that measures relative humidity) can reveal chronically high indoor humidity that accelerates condensation inside walls. Most building professionals suggest maintaining indoor humidity between 30 and 50 percent.
- Monitor utility bills: An unexplained rise in heating or cooling costs can indicate that insulation has lost its effectiveness - sometimes because it's become wet.
Use a Moisture Meter Before You Assume
Inexpensive pin-type moisture meters, available at most hardware stores, can detect elevated moisture in drywall and wood without cutting open a wall. Readings consistently above 16-17 percent in drywall or wood trim near a suspected problem area are worth investigating further with a professional. Think of it as a first-pass screening tool, not a definitive diagnosis.
If you suspect active moisture intrusion, act promptly. Turn off the water supply to the affected area if a plumbing leak is possible, improve ventilation, and document any visible damage with photographs before calling a professional. For a broader framework on spotting developing problems throughout your home, the home maintenance checklist guide offers a structured starting point.
Prevention Strategies That Make a Difference
The most effective approach to wall moisture is preventing it from accumulating in the first place. Several durable practices reduce risk substantially:
- Seal the building envelope: Caulk around window and door frames annually. Inspect flashing at roof penetrations and wall transitions. Address any gaps in siding promptly.
- Control indoor humidity: Use exhaust fans in bathrooms and kitchens during and after use. Consider a whole-house or room dehumidifier in persistently humid climates or below-grade spaces.
- Maintain plumbing: Inspect supply lines under sinks and behind appliances for signs of corrosion or slow dripping at least once a year.
- Ensure proper vapor control: In colder climates, vapor retarders on the interior side of exterior walls slow the migration of warm, humid air into the cooler wall cavity where it would condense. Consult a contractor about whether your home's wall assemblies are appropriate for your climate zone.
When repairs are needed inside walls - whether for moisture damage or any other reason - be aware that some work, including anything touching electrical systems or structural framing, typically requires permits and licensed professionals. Always verify local code requirements before beginning.
This article is for general informational and educational purposes. For concerns about structural integrity, mold health effects, or electrical safety, consult a licensed professional qualified to assess your specific situation.
Frequently Asked Questions

Author
Home & Garden Editorial Team
Home & Garden Editorial Team is the collective byline for our editorial team and contributor network. Articles published under this byline or an editorial pen name are researched, written, and reviewed according to our editorial standards for clarity, consistency, and independence before publication.
View all articles →